An optical drawing is a comprehensive blueprint that enables the production of optical systems and components according to their specific design and performance requirements.
These drawings adhere to a relatively standardized format, having been streamlined by optical designers and engineers to enable manufacturers to easily follow and implement the designs contained within.
The ISO 10110 specification is regarded as the international standard for optical drawings because this guidance details geometric dimensions and tolerance specifications for all optical parts and systems.
The standard format of an optical drawing is illustrated in the image below (Figure 1).
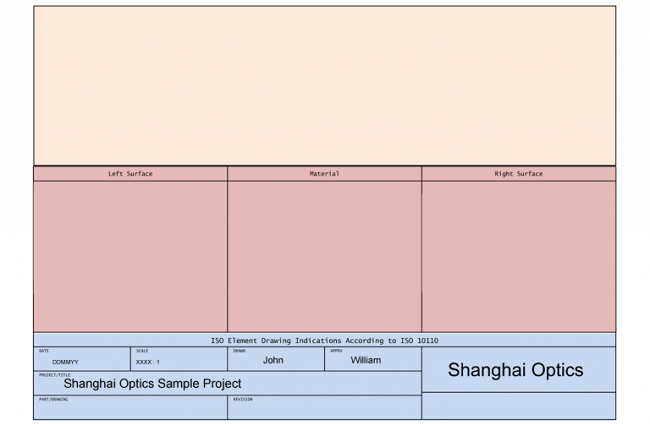
Shanghai Optics Sample Project. Image Credit: Shanghai Optics
Optical drawings are generally comprised of three sections:
- The drawing field (Figure 1, orange area)
- The table field (Figure 1, pink area)
- The title field or title block (Figure 1, blue area)
Figure 2 provides a working example of an optical drawing. This example highlights the application of each of the three fields mentioned above.
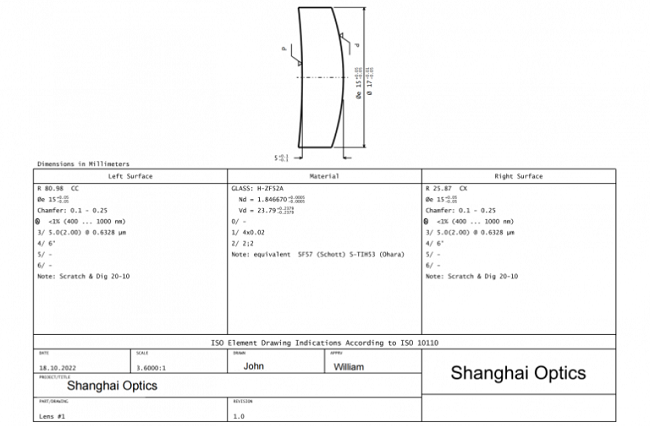
an example of what an optical drawing. Image Credit: Shanghai Optics
The Drawing Field
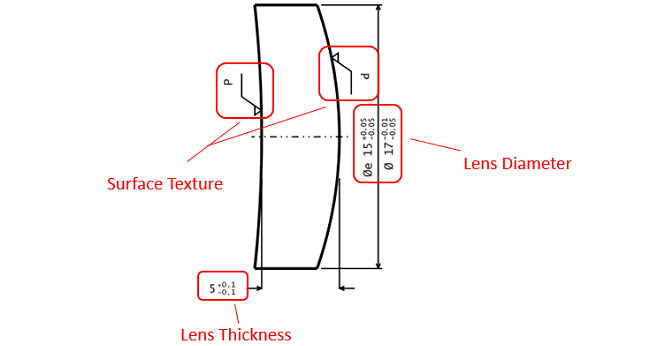
Image Credit: Shanghai Optics
The drawing field provides a graphical representation of the optical system in question. A typical drawing field will provide detailed information on:
Surface Texture: Any small, local deviations of a surface from the perfectly flat ideal plane. In this context, the letter P denotes a polished surface.
Lens Diameter: The physical measurement of the diameter of the front-most part of the lens.
Lens Thickness: The distance between the two surfaces of the lens, measured along the optical axis.
The example presented here shows a polished meniscus lens, detailing exactly how large and how thick this lens should be.
The Table Field
The example optical component shown here has two optical surfaces, so the table field will be divided into three subfields.
The left subfield features the specifications of the left surface, while the right subfield features the specifications of the right surface. The middle field, however, refers to the specifications of the material used to produce the lens.
Surface Specifications
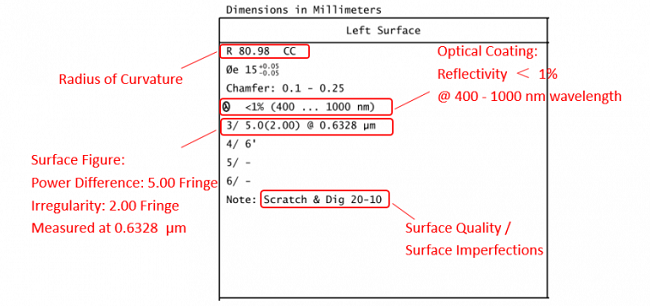
Image Credit: Shanghai Optics
Figure 3 shows a closeup of the table’s surface specifications section. It should be noted that when describing the radius of curvature, CC refers to a concave shape, while CX refers to a convex shape.
Material Specifications
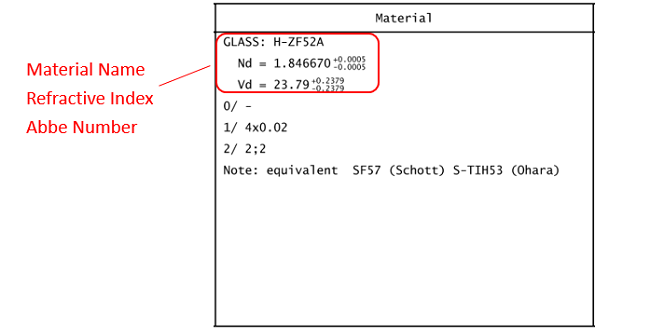
Image Credit: Shanghai Optics
Figure 4 features a closer look at the table’s material specifications section. A range of vital information is provided in this section.
1/ : Bubbles and Inclusions
Usually written as 1/AxB, where:
A is the number of allowed bubbles or inclusions in the lens, and B is the length of the side of a square in units of mm.
2/ : Homogeneity and Striae
Usually written as 2/A;B, where:
A is the class number for homogeneity, and B is the class for striae
The Title Field

Image Credit: Shanghai Optics
Figure 4 shows an example of an optical drawing’s title field. This field provides an array of important information, including the name of the designer or engineer, the date the design was done, its version number, the project name, and the scale.
It is important to note that drawings may use different expressions in specifications and may work with different units of measurement. It is, therefore, important to clarify this prior to commencing manufacture.
Acknowledgments
Produced from materials originally authored by Shanghai Optics Inc.

This information has been sourced, reviewed and adapted from materials provided by Shanghai Optics.
For more information on this source, please visit Shanghai Optics.