Laser beam profiling can prove to be a valuable practice when incorporated into the laser’s planned, corrective or preventative maintenance routines. Users generally believe that the quality of the laser beam has been addressed at the R&D stage, or at the production or integration stages of the system. While this may be true in most cases, it is not always the case.
Laser beam profiling is similar to using an imaging device to record and show the spatial intensity of a laser’s energy. Software is interfaced in this imaging device that conducts attribute measurements like beam wandering, beam size, peak energy to centroid location, and also determines other beam properties. Users can also include an average energy or power for each pulse measurement so as to calibrate these measurements. On the whole, laser beam profiling can be either simple or complicated depending on users’ understanding, but the implementation of laser beam profiling practices can prove advantageous at the end-user stage of a laser’s service life.
Laser Optimization
The laser’s structure of energy distribution, or mode, must be optimized for the process to be carried out. For example, a Gaussian or cone-shaped mode with a high peak power close to the beam’s centroid should be obtained for etching, marking, micro-welding, and other cutting applications. For most welding applications, a flat-top mode must be obtained, and for high-powered cutting lasers, a TEM01* or donut mode should be achieved. When the laser’s mode is being optimized, several factors play a major role. These include optical alignments, process parameters, condition of laser components, etc.
When users buy their lasers, a set of parameters would have been already optimized for their specific process, and the condition and alignment of the laser’s components would have also been optimized. However, further optimization of parameter and alignment had to be performed during the time of installation, in addition to monitoring and substantiating at the time of routine operation. The laser could provide relevant feedback like internal average power monitoring that would give an indication about the laser’s performance. However, in order to ensure optimal laser performance, a better understanding of the laser’s performance at the workpiece is required.
In the case of industrial lasers, energy or power monitoring at the workpiece, and a focused spot analysis (FSA), must be implemented in monitoring and maintenance practices, since it considers all the components of the laser system and provides a suitable way to objectively study and adjust in real-time. Internal power monitoring gives an indication of a part of the laser’s system, which is usually the resonator. Veteran laser users would know that process parameters do not always result in continued laser efficiency. For example, users would find that weld penetration fails to remain consistent over time or components would have to be run at a slower rate to achieve the same outcomes. When the beam fails to do the job, the power is usually increased. However, merely increasing the power level of the laser does not always translate into higher beam quality. A laser’s profile at three different power levels is shown in Figure 1.

Figure 1. Laser beam profiles
It can be seen that the energy intensity of the laser is not too high at the lower power setting, and with the elevated power setting of the center image, the laser’s energy appears to be optimized. However, the laser’s mode seems to disintegrate with the laser configured at its highest power setting in the third image, thus reducing the laser’s efficiency. The phrase “optimizing a laser for power” means a standard power measurement is obtained external to the laser with a power meter, while the laser is tweaked until its average power is at its highest value. In Figure 1, the power measurement of the laser would be the highest at the third setting, but this would not be an optimal laser setting.
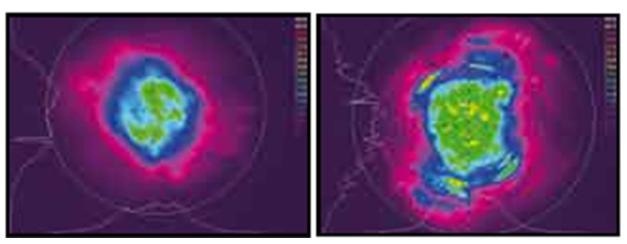
The laser’s efficiency will rely on regular and reliable monitoring so as to determine the right time for its tune-up, preventing catastrophic failure if these indications are not addressed. An experienced laser user ensures that the flash lamp of the Nd:YAG does not reach the end of its lifespan. Over time, a laser’s optics, crystal, and other part can degrade, thus leading to poor performance. Users will find that laser beam profiling offers the most objective way to track these changes over time. Beam profiles can be ultimately correlated to degradation of these parts, and scheduled maintenance can be implemented or adjusted for monitoring beam profiles. Beam profiles from the same laser are shown in Figure 2.

Figure 2. (L to R) Profile from factroy and Profile at 6 months
In Figure 2, the left image displays a mode structure that is quite uniform, and the right image displays a beam profile showing a mode structure that has become fairly unstable with standard usage. Users who have implemented beam profiling within their maintenance practices have discovered that frequent beam profiles can increase maintenance periods because the laser’s efficiency lasts for a longer period of time than predicted. This in turn leads to reduced laser down time. With the use of beam profiling, the performance of the laser can also be optimized to maintain or improve throughput in the case of parameter optimization. In certain cases, laser validation may become necessary, regardless of external or internal requirements.
While opting for laser measuring and analyzing tools, care must be taken to ensure that the most precise tools are selected. For example, UltraCalTM is the patented, ISO standard of setting a baseline for the beam profiling imaging device. It inspects the electronic noise present in the imaging device, detects ambient lighting in the beam profiling environment, and subsequently sets that noise level at the baseline in the analyzing software. If a beam is delivered to the imaging device, the increased intensity is due to the laser’s beam. The amount of data obtained from the laser can also impact the measurement precision.
Even when there is no need for laser performance monitoring, beam profiling should still be implemented into laser maintenance practices because it is the most objective way to determine the quality of beam. Beam profiles can also provide a way to reduce scrap or recalled components.
Preventing Laser Problems
Laser components will fail over time, completely affecting the laser or reducing its productivity. Veteran laser users would be able to detect and study the symptoms, and fix the issue quickly, thus reducing the expense. Novice users would need to hire an external entity to restore their lasers, which proves more costly in the long run. The image on the left of figure 3 shows a focused spot of marking laser with severe fiber misalignment, and the right image shows the focused spot of the same marking laser following fiber realignment.

Figure 3. (L to R) Focused spot of marking laser with severe fiber misalignment and focused spot of same marking laser after fiber realignment
A beam profiling system may not appear to be worthy, but the costs of beam profiling, laser power/energy measurement and other diagnostics tools, along with training on laser maintenance, make more sense in today’s economic times because such preventative maintenance costs compensate for corrective maintenance costs.
Beam Profiling: Effective, Practical, Simple
Often, it is believed that beam profiling is a complex process which is difficult to incoporate into maintenance routines. However, the process is relatively simple, and would ultimately save a considerable amount of time and money. In order to learn more about laser, the most relevant place in the beam path is at the workpiece. One way to increase the beam quality is to use beam profiling, along with power/energy measurement at the workpiece, to optimize both the process parameters and the beam path component alignments following the initial system delivery. This would allow users to begin with increased throughput and low scrap rates. They would also be able to validate the laser, and thus eliminate it as a variable during process validation for batch runs or for specified period of time, regardless of the need for external or internal validation. This laser beam analysis also makes sure that the quality of the beam remains high with regard to the degradation of laser components. It will help users to anticipate laser downtime and even extends scheduled maintenance cycles.
Conclusion
If one of the laser components fails, a trained user will have the required tools to fix this issue quickly and restore the laser system back to its original condition, all of which would save cost to the organization. Some users may imagine that the laser is powered by magic. This is because they do not have the right tools and knowledge to analyze any problems.

This information has been sourced, reviewed and adapted from materials provided by Ophir Photonics Group.
For more information on this source, please visit Ophir Photonics Group.